Tekla Structures 2020 introduces several improvements regarding the use of Trimble Connect and Trimble Connector. Starting Trimble Connect collaboration is now easier, and new lightweight reference models have been added. New buttons on the ribbon also make it faster to access and work with Trimble Connect and Trimble Connector. All operations between Tekla Structures and Trimble Connect use the project base point. This means that, for example, reference models exported or downloaded from Tekla Structures are placed in relation to the project base point in Trimble Connect. If you have not defined a project base point, the model origin is used.
Starting collaboration is quicker
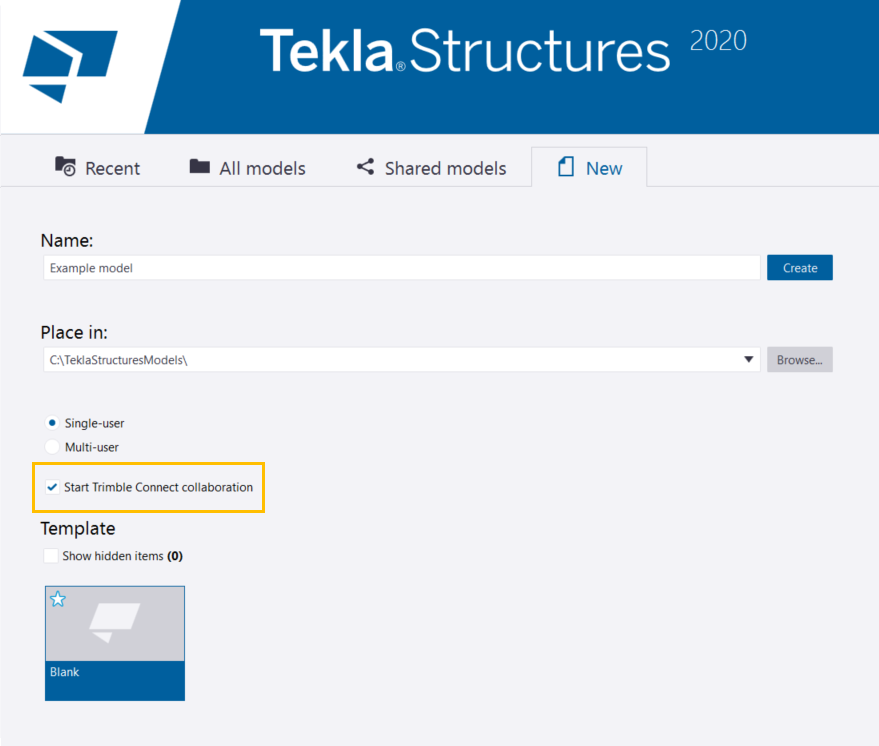
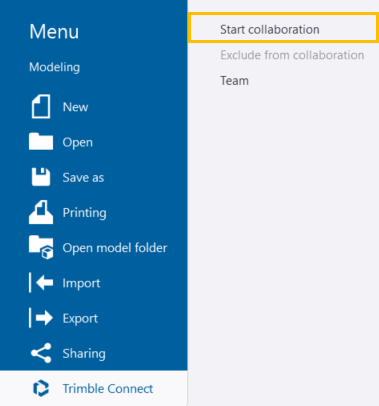
You can now link your Tekla Structures model to a Trimble Connect project either right away while you are creating a new model, or later through the File menu.
- To link a new model to a Trimble Connect project, select the Start Trimble Connect collaboration check box on the start screen.

- To link an open model to a Trimble Connect project, on the File menu, select > Start collaboration.

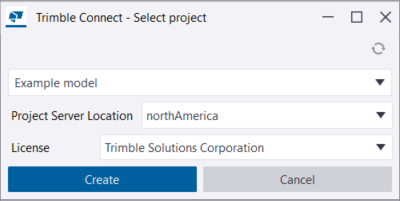
In both cases, the Trimble Connect – Select project dialog box opens. Here, you can select if you want to link your model to a new Trimble Connect project or an existing one.

- To link the model to a new Trimble Connect project, type a name for the project in the field at the top of the dialog box, and click Create.
- To link the model to an existing Trimble Connect project, select the project from the list at the top of the dialog box, and click OK.
New buttons on the Trimble Connect tab
The tab has new buttons that make it quicker and easier to access different Trimble Connect products and Trimble Connector. See the new buttons below.
| Button | Action |
 For Browser | Opens the linked Trimble Connect project in the Trimble Connect for Browser web application. The For Browser button has the following sub-commands:  Project explorer: Opens the Project explorer page for the linked Trimble Connect project. Project explorer: Opens the Project explorer page for the linked Trimble Connect project.On the Project explorer page, you can create new folders, Sketchup models, or map workspaces. You can also upload new files, and sync the project from Trimble Connect for Windows.  3D view: Opens the Trimble Connect 3D model view of the linked project. 3D view: Opens the Trimble Connect 3D model view of the linked project.In the 3D model view, you can adjust how 3D models are shown, select objects, and add ToDo notes, views, markups, clip planes, or measurements.  Team: Opens the Team page for the linked Trimble Connect project. Team: Opens the Team page for the linked Trimble Connect project.On the Team page, you can invite new users to the project, create user groups and add members to them, and manage user roles. |
 Upload model | Uploads the Tekla Structures model to a Trimble Connect project folder as a read-only .tekla reference model. The .tekla reference model is an overlay model that works as the counterpart of the Tekla Structures model in the linked Trimble Connect project. Uploading the Tekla Structures model as a .tekla reference model allows you to use ToDos and other Trimble Connect commands with the model. NOTE: The  Upload model button is not available in models that have been shared with Tekla Model Sharing. Instead, you can select if and when a shared model is uploaded to a Trimble Connect project folder. Upload model button is not available in models that have been shared with Tekla Model Sharing. Instead, you can select if and when a shared model is uploaded to a Trimble Connect project folder.In the Advanced Options dialog box, set the value of the XS_UPLOAD_SHARED_MODEL_TO_CONNECT advanced option to one of the following: BASELINE: The shared model is automatically uploaded to the set Trimble Connect project folder each time a user creates a new baseline. WRITEOUT: The shared model is automatically uploaded to the set Trimble Connect project folder after each successful write out. If you do not want to upload the model to a Trimble Connect project, clear the Value field. |
 Models | Opens the list of models in the linked Trimble Connect project. You can adjust how models are shown, add Connect models as overlays on top of the Tekla Structures model, create new sub-folders for models, and remove models from the list of used models. You can also download or export reference models. |
 ToDos | Opens the list of ToDo notes in the linked Trimble Connect project. You can add and modify ToDo notes, add markups or comments for ToDo notes, and assign ToDo notes to users or user groups. |
 For Windows | Opens the Trimble Connect project linked to the current Tekla Structures model in the Trimble Connect for Windows application. |
 Match with Trimble Connect for Windows view | Adjusts the camera, zoom level, and projection of the Tekla Structures model view to match the current 3D view in Trimble Connect for Windows. |
 Match with Tekla Structures view | Adjusts the camera, zoom level, and projection of the Trimble Connect for Windows 3D view to match the current model view in Tekla Structures. |
 Select in Trimble Connect for Windows | Select in Trimble Connect for Windows Selects the objects that are currently selected in the Tekla Structures model also in Trimble Connect for Windows. |
 Select in Tekla Structures | Selects the objects that are currently selected in Trimble Connect for Windows also in the Tekla Structures model. |
New overlay models
An overlay model is a lightweight reference model that is stored in a Trimble Connect project. Overlay models show model objects, parts, rebars, bolts, and assemblies on top of Tekla Structures models. However, pours and pour units are not shown. You can attach overlay models to your Tekla Structures model, view the attached overlay models in a clear tree structure, and manage overlay models in several ways.
To start managing overlay models:
- Click
 Models on the tab, and ensure that the Overlay models tab is open.

Here, you can:
- hide or show overlay models by clicking the
 and
and  icons
icons - adjust the scale and position of overlay models in the Properties section
 Restriction:
The Rotation X and Rotation Y values are currently ignored when you insert an overlay model to Trimble Connect. - remove overlay models from the model list and from the local computer
- create sub-folders for overlay models under a Trimble Connect folder
- attach new overlay models to your Tekla Structures models
- zoom to overlay models in a Tekla Structures model view


 Tiếng Việt